Friday, March 30, 2012
Gardens Instead of Grass
I came across this inspiring You-Tube video yesterday. To me, this video shows just how practical biology truly can be. I'm sure that the people engaging in this type of gardening rarely consider they are engaging in an extremely applicable aspect of biology but they are. Gardening is biology, but as the video demonstrates extremely well, gardening is also an important educational, psychological, sociological, and economical activity. The benefits of gardening are tremendous. As you know I am an extremely active gardener. Through this simple activity I have gotten to know neighbors, taught my kids many different things, learned a ton about growing plants, saved thousands of dollars on groceries, and I get some great food. I have lots of plans for expanding my own gardening at home but unfortunately so little time. I imagine it will be done someday though.
Monday, March 26, 2012
The Science of Fishing
 |
| Bluegill. |
A lot of fish behavior will be determined also by bug behavior as well as habitat. I have found that in many trout streams bugs are most active during the middle part of the day and therefore trout are also most active during the middle of the day, making it the best time to fish. Bass and bluegill though seem to be most active early in the morning or late in the evening, making those the best times to fish for these species. As for habitat, nearly all fish like some sort of cover whether its a pile of rocks, weeds, or an over hanging bank making these the best areas to fish.
 |
| Rainbow Trout. |
Friday, March 23, 2012
How to Grow Mushrooms in the Desert
 |
| Larger but still dehydrated oyster mushrooms. These mushrooms are rock solid due to the dry desert air. |
 |
| A few elm oyster mushrooms grown in the enclosed chambers described below. |
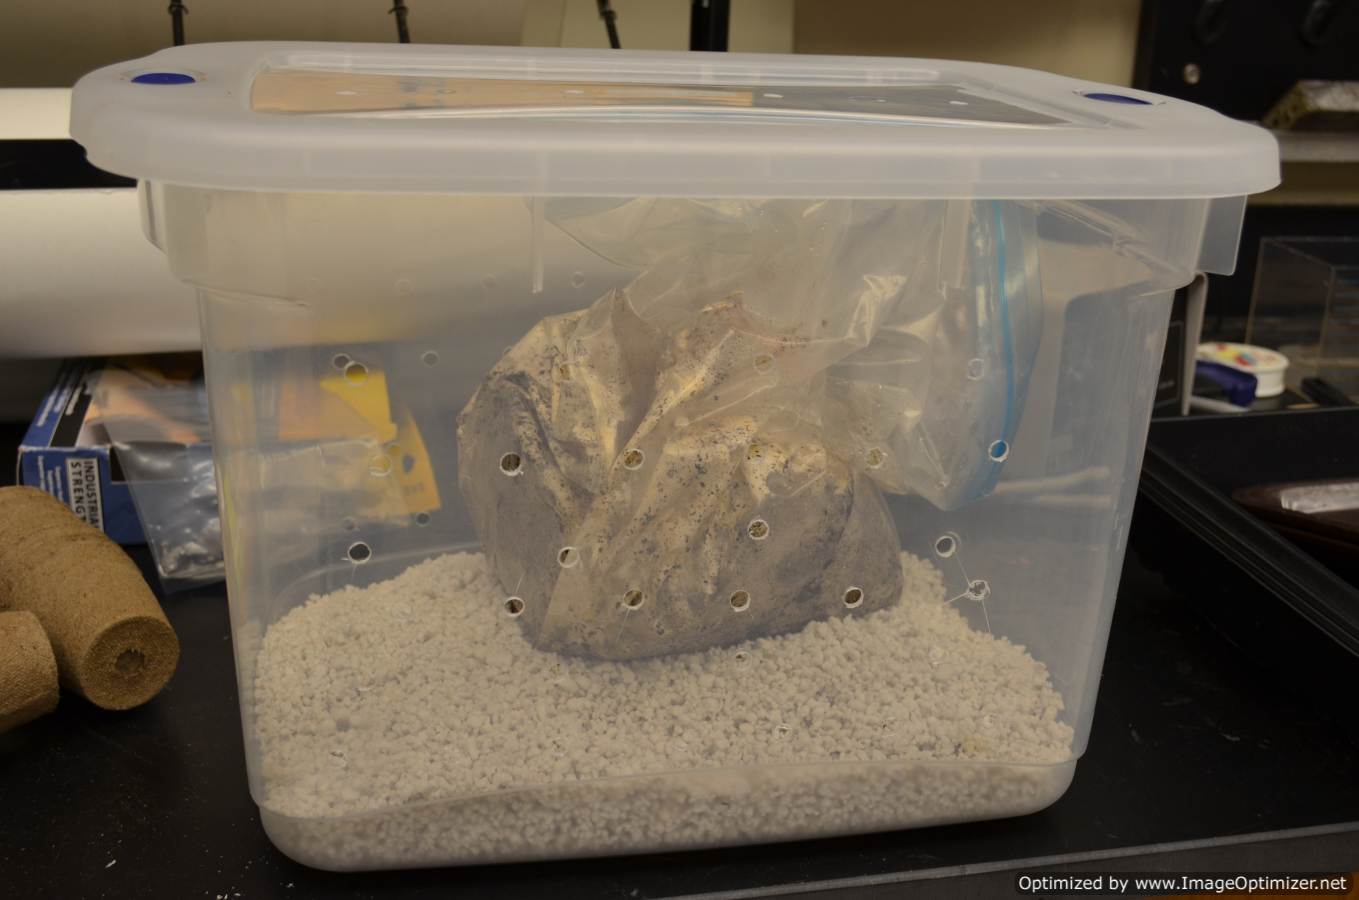 |
| The enclosed chamber we use to elevate humidity levels for growing mushrooms. |
Tuesday, March 20, 2012
Growing your own pineapple
 |
| A pineapple flower. |
Well over a year ago discussed how to grow your own pineapple plant from a pineapple you purchase from the supermarket (Growing Pineapple). Now, almost two years after planting the pineapple top we finally have a flower, which hopefully means we will have a fruit within a few months. If you want to grow your own pineapples it really is quite easy. First, buy a healthy looking pineapple from the grocery store. Second, cut the green top off of the fruit. Cut the top off about one inch below the green leafy portion, making sure at least some of the fruit is attached to the top. Third, let the top dry out for several days. And lastly, plant the top in potting soil and make sure to keep the soil moist. Within a few weeks your top should root and begin to grow. You can tell if you have a healthy pineapple by looking at the leaves in the very middle of the plant. If these smaller leaves are green and growing you know you have a healthy plant. If there are no small leaves or if the leaves look unhealthy the plant is not doing well and you might want to start over with a new top. In my experience nearly every top will root. I have only seen one of these plants produce a flower though. I would guess the other pineapple plants will eventually flower.
Friday, March 16, 2012
White Tank Mountains: Mesquite Canyon Trail Part 2
 |
| Barrel cacti. |
 |
| Saguaro Cacti along the Mesquite Canyon Trail. |
Continuing on the trail, by the time the trail hits about 3,000 feet, close to the Ford Canyon Trail, Saguaros are extremely rare. The Ford Canyon Trail reaches slightly over 3,000 feet, here average temperature has decreased to about 70 degrees (4 degrees cooler than the base of the mountain) and precipitation increased to about 11 inches (about 3 inches greater than the mountain base). At this elevation there are far more grasses. Also, if you look closely at the ground often charred sticks and stumps can be found. Anytime there is an increase in grasses there is also an increase in the presence of fire. Charred sticks and stumps indicate the historical presence of fire at this elevation. It seems that charred wood increases right around 3,000 feet near and along the Ford Canyon trail. With fire and freezing temperatures more frequent at this elevation, cacti, and especially saguaros, are much rarer.
Hiking through this higher elevation area there are two main vegetation types, areas dominated by brittle bush and areas dominated by grass. Brittle bush generally occupies ridge tops where the soil is extremely rocky and loose. These areas are extremely well drained and therefore very dry. Lower on the hill or mountain sides through soil becomes more stable and better developed. Red coloration of this soil is an indicator of its stability and anywhere there is reddish soil there is an abundance of grasses. Likely, water runs off higher slopes where brittle bush is present into areas where grass dominates, making grass dominated areas generally wetter. And when I say wetter I mean that in a desert sense, where wet is still very dry. These grasses are quite interesting, they are almost bushy and semi-woody. Most of the year they are a drab tan color but in spring after winter rains and late summer after monsoon storms they will green up considerably. The higher elevations of the White Tanks are blanketed with rolling hill and mountainsides of these two or three foot high grasses; quite a different sight from the desert shrubs and cacti of lower elevations. There are three different grasses that dominate here: three-awn, tobosa, and big galleta. Tobosa and big galleta look almost identical and are almost bush like. Three-awn is more grassy standing more up-right.
 |
| Desert grasslands found at the upper elevations of the White Tank Mountains. |
Taking the Willow Canyon Trail where it intersects with the Ford Canyon Trail, will return back to Mesquite Canyon trail. From here it is a generally down slope hike. With the lower elevations down slope and corresponding lower rainfall and higher annual temperatures, the desert vegetation returns.
This concludes the Mesquite Canyon-Ford Canyon-Willow Canyon trail loop in the White Tank Mountain Park. Currently I am 59 miles towards my goal of 150 miles of hiking this year. I have two other nature hike posts ready to go for the near future. I am wanting to get all my hiking in prior to the scorching heat of summer that starts in June. I am really enjoying this hiking goal. So far I can tell there have been huge benefits in the way I feel and the strength of my body. When I started an eight mile hike would leave me tired and soar. Now though, an eight mile hike is easy. In the very near future I will be doing a 13 mile hike, hopefully my body will hold-up without problem.
Monday, March 12, 2012
White Tank Mountains: Mesquite Canyon Trail Part 1
 |
| Saguaros along the Mesquite Canyon Trail. |
The Mesquite Canyon Trail loop is the first hike into the mountains to be posted here and will introduce us to some of the common aspects of desert mountain ecology. The White Tank Mountains are a small isolated range in the Sonoran Desert just west of Phoenix. At the start of the hike at the mountain base the elevation is about 1,500 feet. Peak elevation in the White Tanks is just above 4,000 feet but the peak elevation for this trail is around 3,000 feet along the Ford Canyon Trail portion of this loop. The trail begins on the bajada which was deposited by Mesquite Canyon which the trail continues into. This first section of trail through the canyon is quite steep as elevation increase about 500 feet in the first mile or so. This is the roughest portion of the hike and after that it smooths out. Mesquite Canyon Trail continues for a total of 3.1 miles until it reaches the Ford Canyon trail for which you take for 0.7 miles. At that point you return to Mesquite Canyon via the Willow Canyon Trail which is 1.6 miles. From there you return to the mid-point of the Mesquite Canyon Trail and continue downslope the way you came up through the canyon. Total round trip is 8.1 miles.
Starting at the ramada parking lot, the trail begins up a flat bajada gently sloping up towards the mountains. This bajada was deposited by the canyon the trail continues into. All of the sediments of this bajada were once carried by erosion off the mountain sides and by flashfloods through Mesquite Canyon and deposited outside the mountain to for an alluvial fan of the bajada. Hiking into the canyon you can begin to see this bajada forming process. The bajada begins as giant boulders from the mountain that are cracked and broken into increasingly small pieces until they form sand. Most of the White Tanks are what is considered White Tanks Granite which forms a lot of sandy sediment when broken down. Extreme desert heat, water, and plants all work together to break down the large rocks into sand. As the rocks break down they are carried downslope and out of the canyon through the wash during flashfloods until they are deposited in an alluvial fan somewhere at the end of a wash. Several alluvial fans deposited this way form a bajada.

At first in the canyon the trail continues on a north facing slope. Looking closely, the plants are mostly Brittle Bush, Globe Mallow, and Jojoba, there is a peculiar absence of cacti. Looking across the canyon to the south facing slope there are a lot more cacti and Palo Verde along with Brittle Bush. Why the difference? Both sides have the same granitic rocks and about the same soils so rocks or soil can’t explain the difference. The south facing slope however, is far more exposed to the intense desert sun and therefore is significantly warmer and dryer than the north facing slope. It probably is too cold for cacti to survive on the north facing slope and jojoba likely prefer the greater moisture content there. North facing slope plants therefore likely can tolerate the cooler temperatures of that slope and are supported by the greater amount of moisture there. South facing slope plants likely need the heat to survive and are able to tolerate the lack of moisture. Also, looking closely at the soil you will notice there is an abundance of mosses, lichens, and other very low ground cover on the north facing slope. This low ground cover is known as cryptobiotic soil crusts and again is a result of the greater amount of moisture on that slope. The south facing slope with its lack of water due to greater sun exposure results in a near absence of cryptobiotic soil crusts.
 |
| Ferns that sprout from cryptobiotic soil crusts after rain. |
Heading up the mountain, the trail climbs over a ridge top and continues along the side of a second canyon. Here the trail levels off significantly and after a little ways the wash bed of this canyon can clearly be seen. The wash bed is directly cut into the mountains granite. It has been eroded and polished smooth by millenniums of sand washing over it and wearing it down. The eroded smooth granite appears almost white in coloration and is full of small holes, known as tanks. After rainfall and flash floods moving through the canyon these tanks fill with water. On my recent hike all of the tanks were full of water due to rainfall a month prior. These tanks, carved in whitish colored granite, are where the White Tank Mountains gain their name. These tanks also are an amazing asset to the local wildlife being they hold water for months after rain falls. Without these tanks there would be far fewer mule deer and mountain lions in the White Tanks. (Yes, it’s true, there is a healthy mountain lion population in the White Tanks. So watch out!)
Friday, March 9, 2012
Cold Frames for Desert Gardening
 |
| A cold frame very similar to mine. |
The cold north is where you would typically expect to find cold frames utilized in the garden. Where it is cold they do a great job of protecting frost sensitive plants in early spring or late fall. They can also serve as a greenhouse, warming things up so seeds germinate sooner and grow quicker. In the south though were freezing temperatures are rarely an issue I know of only a few gardeners that ever utilize clod frames. This winter however I made a make-shift cold frame/mini greenhouse in hopes of speeding up the growth of my late start garden. As I mentioned in a previous post, someone killed my entire garden at home and I had to start everything over again in late November. Far too late for growing anything productively. So out of desperation I bought some cheep clear plastic, covered the garden with it, and propped it up 12 inches or so with sticks. It was sort of a ghetto cold frame but it worked really well. The cold frame was entirely closed in order to trap heat inside. This resulted in the seeds germinating very quickly compared to seeds planted at the same time without the cold frame. Moisture was also trapped inside and I had to water the garden a fraction of the times I would have needed to if the garden wasn’t covered. The heat and higher humidity also sped-up growth of the seedlings significantly. The loss of a dead garden in the end of November was quickly redeemed by these simple cold frames. I am already planning to use them next winter. I am guessing that utilizing the cold frames earlier in November could speed up growth and increase production a lot.
Advantages of using a cold frame in the desert or warm south
- Protection from infrequent freezing temperatures
- Moisture retention so watering needs are greatly reduced
- Increased humidity which increases plant growth
- Increased temperature which speeds up germination and plant growth
- Overall increased productivity!

Monday, March 5, 2012
Easy Enzyme Experiment: Potato Catalase
 |
| Catalase enzyme formed the bubbles in the two tubes on the right. The tubes contain extracts from beef muscle, kidney, and liver from left to right. |
In a post awhile back we discussed the enzyme catalase and its presence in animal tissues such as liver, kidney, and muscle. Catalase was and is found to be extremely abundant in the liver, a reflection of the livers cleansing function. It is also present, but much less so, in the kidneys, also a reflection cleansing function. Muscle tissue however had no detectable catalase due to the fact that it is not a cleansing organ, waste products from the muscles are rather filtered and cleaned by the liver and kidneys. Catalase also has been found in plants, where its presence is often mysterious. Plants of course are not producing waste products similar to what animals produce, so why would they need catalase? We can discover the answer partially by simply understanding the function of catalase.
This is what catalase does in general:
Hydrogen Peroxide + Catalase → Water and Oxygen
Hydrogen peroxide is a highly oxidative molecule, meaning it causes processes similar to rusting to occur. Metals rust as they react with oxygen and oxidative molecules cause rusting to occur. Similar “rusting” or oxidative reactions can occur in plant or animal tissues if oxidative molecules are present. This is why anti-oxidants are such a big deal, they prevent tissue from oxidizing by getting rid of oxidizing molecules such as hydrogen peroxide. Catalase is such an anti-oxidant molecule. Catalase also converts reactive oxygen, which also oxidizes, into hydrogen peroxide and then into harmless water and oxygen. (Of course I have simplified these reactions, so chemists, refrain from complaint!) At the end of a reaction catalase is preserved and available to repeat the reaction over again with more oxidative molecules. Amazingly, one catalase enzyme can repeat these reaction up to 40 million times in one second!
Another catalase reaction:
Reactive Oxygen + Catalase → Hydrogen Peroxide + Catalase → Water and Oxygen
In animals, such as us, oxidative molecules are most often produced through our metabolizing of food molecules. So the presence of catalase makes sense. Plants do not eat, so why would they need catalase? If we study the process of photosynthesis we may come across a term called photorespiration. Photorespiration simply is when a plant receives too much light and not enough water. As a result, the plant can produce large amounts of hydrogen peroxide which can kill the plant. Fortunatly, catalase prevents the accumulation of hydrogen peroxide by converting it to water and oxygen, and so saves the plant from oxidative damage.
A Simple Catalase Experiment Using Potatoes:
Some plants such as potato and spinach have very high levels of catalase, far higher they they would likely ever need to prevent photorespiration damage. Why that is, no one seems to know. Scientists have had many ideas and have researched the question for almost 100 years but no one can figure it out. But it makes isolating the catalase enzyme very inexpensive and easy if you want to run a simple experiment. The following is a simple enzyme experiment anyone can run.
Materials:
Potato
Test tube or other small container
Hydrogen Peroxide
1. Cut up a potato and mash it. Do not cook it, cooking will break down the enzyme so it won’t work.
2. Place the mashed potato in a test tube or other small container.
3. Add hydrogen peroxide. If there is catalase present foam should be produced.
The foam produced is a result of catalase converting hydrogen peroxide into water and oxygen, the bubbles are filled with this oxygen. The more bubbles produced the faster catalase is carrying out this reaction, or the more catalase present. The above would be considered the control for the experiment and simply indicated the presence of catalase in the potato. Tests can be preformed to determine the effects of different conditions on the enzyme function. By adding baking soda to the potato, a high pH or basic molecule, will change the pH and have an effect on how well catalase functions. To another test tube, add vinegar to the potato which will lower the pH, making it acidic also having an effect. Also try freezing or cooking the potato before adding hydrogen peroxide to determine effects. Remember, the more foam produced the better the catalase enzyme is working. Less foam means it is not working as well, and no foam means it is not working at all. Test it out and see what you find.
 |
| Potato catalase experiment. The boiled tube (left) produced no bubbles indicating catalase has been degraded by the heat. Room temperature tube (middle) produced the most bubbles indicating catalase is highly functional at this temperature. The tube kept on ice (right) produced fewer bubbles indicating the lower temperature slowed down the catalase enzyme. |
Friday, March 2, 2012
March Garden Economics Update

It’s been quite a while since I blogged an update on the garden. Reason being I’ve had my frustrations and it just hasn’t been that interesting. After planting my garden back in October I had to leave the state for several weeks and a neighborhood girl was supposed to take care of my garden. Unfortunately, the girl didn’t do much of anything and everything died, which is rather an impressive feat. I am still not entirely sure how she pulled that one off. Even the onions died which I previously thought was nearly impossible. So I had to restart everything mid to late November. Being temperatures are quite cool in mid to late November it is not ideal for starting a garden. Germination and growth is extremely slow, what took a week in October might take a month in November through December. I half heartedly planted anyway, and to compensate for the lower temperatures I created a one foot tall “greenhouse” over the planted beds. This “greenhouse” simply consisted of clear plastic sheets propped up with sticks. Then I sort of forgot about it for several weeks. When I finally got around to checking on it in December everything had germinated and was growing like crazy. The small “greenhouses” had created a much warmer environment with much higher humidity. The need for watering also decreased significantly. By late January everything was doing extremely well, and by late February I removed the “greenhouses” due to warmer temperatures. So what started as a huge problem, followed by a half hearted attempt at a solution, has ended in a great success story. I may use this greenhouse idea next winter to speed up growth and decrease watering needs.
College garden
Eggplant 2 lbs. 14oz $8.59 ($2.99/lbs.)
Eggplant 2 lbs. 14oz $8.59 ($2.99/lbs.)
Tomatoes 3 lbs. 7oz. $10.28 ($2.99/lbs.)
Chard 8oz. $2.50 ($2.50/8oz.)
Radishes 1lbs. 4oz. $3.97 ($1.19/6oz. bunch)
Snap peas 1 lbs. 8oz. $6.24 ($4.99/lbs.)
Cilantro 6oz. $1.98 ($0.33/oz.)
Total produce: $33.56
Total cost: $0.00
Net: -$0.18(previous months) + $33.56 = $33.38
Total produce: $33.56
Total cost: $0.00
Net: -$0.18(previous months) + $33.56 = $33.38
Time: 5 hours (previous total) + 7 hours = 13 hours
Home garden
Chard 1 lbs. 6oz. $6.88 ($2.50/8oz.)
Home garden
Chard 1 lbs. 6oz. $6.88 ($2.50/8oz.)
Radishes 1 lbs. 10oz. $5.16 ($1.19/6oz. bunch)
Cilantro 4oz. $1.32 ($0.33/oz.)
Snap peas 8oz. $2.50 ($4.99/lbs.)
Snap peas 8oz. $2.50 ($4.99/lbs.)
Basil 8 oz $7.96 ($1.99/2 oz)
Total produce: $23.82
Total cost: $15.55 (for plastic and sticks to make greenhouse)
Net: $7.10 (Previous months) -$15.55 + $23.82 = $15.37
Time: 6 hours (previous total) + 8 hours = 14 hours
Total produce: $23.82
Total cost: $15.55 (for plastic and sticks to make greenhouse)
Net: $7.10 (Previous months) -$15.55 + $23.82 = $15.37
Time: 6 hours (previous total) + 8 hours = 14 hours
Rain wise, the desert is extremely dry right now. We did have a good rain back in December but nothing significant since. Currently the National Weather service says we are in a La Nina weather pattern, which typically means dry winter weather. Mid March though is one of the most consistent times of the year for rainfall. So hopefully in a few weeks we will get a good shower. March and April also are the end of the winter cool season garden and the beginning of the summer warm season garden. Currently we are harvesting cool season crops like snap peas, beets, onions, chard, lettuce, cilantro, and radishes. Within the next month we will hopefully be planting corn, tomatoes, eggplant, peppers, summer squash, and okra.
Subscribe to:
Posts (Atom)